
I have compiled all of our art assignments for the fourth nine weeks in case anyone needs to make up any assignments.
Week of March 23
Today, we’ll be playing with a simple process project. You will need paper (any color), and some sort of mark making tools (pencils, markers, crayons or whatever you have!).
Start out by tracing a line around your hand. If you’re working with a parent or sibling, they can help you; or you can use this as a chance to practice careful tracing.

Now trace your hand enough times to fill your paper up – if you’re working with a partner, feel free to trace around both hands! If you’re working solo, it might be easiest to trace the hand you don’t write with (but don’t be afraid to try something hard).
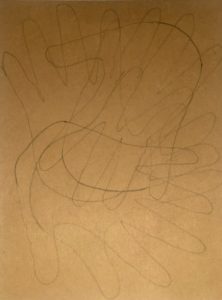
After you trace your hand, you can then fill each of the shapes created by the overlapping lines. Feel free to use solid colors, patterns – whatever you like.
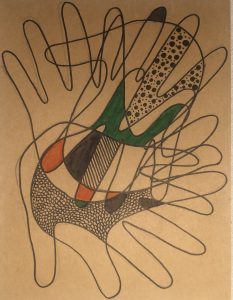
I have only filled in a few of my shapes using black and white patterns as well as solid colors. I decided to stick with my friends Secondary colors (purple, green, and orange). The more shapes you fill in, the more amazing your creation will be!
Have fun!
Week of March 30
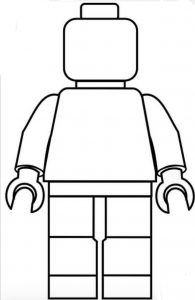
Build a Mini-Fig of your Favorite Person!
First – draw the basic mini-fig anatomy on a sheet of white paper with pencil. You can either look at the image above and draw the mini-fig body or print out the mini-fig diagram above and trace lightly onto a sheet of white paper with a pencil (don’t tell Ms Dailey you’re allowed to trace this time!)
Second – draw details if your mini-fig to make it in the image of your favorite person. It can be your parent, sibling, grandparent, best friend, favorite book/movie character, or even yourself!
Third – color in your mini-fig using whatever you have on hand! Make your outlines distinct.
Fourth – email your creation to mdailey@sacredheartgradeschool.org
I can’t wait to see what you come up with!
Week of April 15
Hello! I hope everyone had a safe and restful break.
Today’s Project is a texture collecting technique that most of us are familiar with – crayon rubbings. Hopefully, most of you were able to catch my quick video this morning along with prayer and announcements. If not, you can find it on the SHGS Facebook page. If you can’t view the video, don’t worry – you’ll get everything you need from these instructions.
All you will need for today’s Creative Break are a few broken crayons, some plain paper (white or color as long as it’s a solid color without print or writing), and an adventurous spirit.
First, peel all the paper off your crayons. I’ve found that soaking your crayons in warm water for a few minutes pops them right off – just be sure to dry them off before you start your texture rubbings. Now, go on a hunt for textures.
Remember that the world is full of textures. Some textures will make better rubbings than others – try making rubbings on all sorts of surfaces – rough/smooth, natural/manufactured, indoor/outdoor (make sure you ask an adult before you go outside), hard/soft. Experiment with the different surfaces you test out. Make sure to place a piece of paper over the texture surface then rub firmly over your paper with the flat side of your crayon.
What kind of surfaces make better transfers?
Fill up at least six full size sheets of paper with crayon rubbings – feel free to use different colors of crayon or paper – and hang onto your rubbings for Wednesday’s project.
Have fun exploring!
After you’ve collected the textures you found, it’s time to make some new textures!
Using your rubbings and some scissors, glue, and a little imagination try to cut, fold, twist, etc. to create your own textures.
I used my texture rubbing of a piece of slate, cut it into different size strips and made a shaggy texture, a bumpy texture, a flat woven texture, a wrinkly texture, and even a texture I don’t know exactly how to describe (but it was fun to create!).
Glue your textures to a new piece of paper and try to use your best describing words (adjectives and adverbs) to talk about the textures you created.
Parents, please send photos of your children’s creations to me at mdailey@sacredheartgradeschool.org
Thank you!
Week of April 20
Hi everyone! I hope you are all doing well.
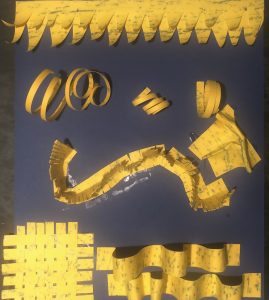
Ms. Dailey misses all your sweet laughs and smiles; maybe that’s why I decided that this week we would make faces for Art. Now, don’t worry about getting out paper or pencil for this project – we’re going to use everyday objects you can find around your house or yard!
First you need to think about all the parts of a face. What will you use for the shape of the face? I used a big kitchen sauce pan for mine – I love to cook and I spend lots of time in the kitchen, so it made sense. This week’s Technique Tuesday video shows how quickly you can make a face (I think finding all the facial features was the hardest part), but remember – it’s ok to take your time.
For your face maybe you’ll use toys, or garden equipment, or sports equipment – something you use a lot around your home. Now you need to think of items to represent the different features of the face: ears, nose, eyes, mouth, eyebrows, etc. Don’t worry about matching shape exactly, I’m more concerned with your use of creativity and imagination!
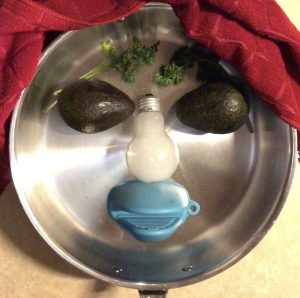
Here is the face I made. It’s super simple. I bet you can all do a much better job than I did, and I’d love to see it! Maybe you can think of other details to add?
Please email photos of your fun creations to me at mdailey@sacredheartgradeschool.org Please include your child’s name (first and last) and home room number in your email subject line, thank you!
Week of April 27
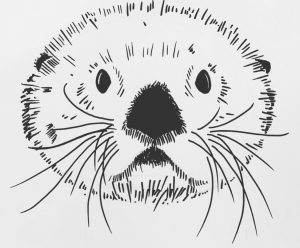
As many of my students know, I love otters -sea otters, river otters, otters, otters, otters!!!
I was looking at another art teacher’s blog and found a darling tutorial teaching us how to draw a pair of otters floating with their paws linked so that they can stay together while afloat – even while sleeping.
Here is the link to the tutorial:
https://artprojectsforkids.org/how-to-draw-a-sea-otter/
There are downloads linked in the article – do not worry about downloading those. Just follow along with her illustrations at the bottom of her to guide you through how to draw the otters.
I want to remind everyone to draw lightly with a pencil first. Drawing lightly with your pencil makes it easy to erase mistakes as well as erasing your pencil marks after you go over your best lines with a marker. After you get your drawing looking like your best today you can outline your drawing with marker, erase your pencil lines, then color in your drawing with crayon, marker, or colored pencils.
I am going to be doing this assignment Monday – just like you – and I will have a video for you to watch for Technique Tuesday.
I look forward to seeing everyone’s otters (did I mention they’re my FAVORITE!?)!
Please email your artwork to mdailey@sacredheartgradeschool.org and please be sure to include the student’s first and last name and homeroom number. Thank you!
Week of May 4
Hello my Artist friends!
I hope everyone has had a great week!
Today we’re going to explore 3-D building made with recycled materials. All you need is a cardboard box (I have had so many things delivered during the Stay-at-Home, I had a couple ready to be recycled), or some scrap corrugated cardboard and some strong scissors.
Cutting cardboard can be difficult, so your student will probably need some help cutting the cardboard. This is a building activity parents AND children can enjoy, so settle in and have some fun!
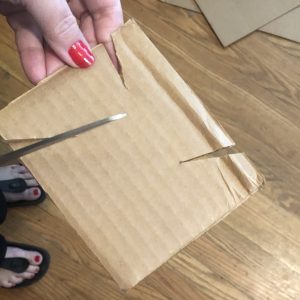
First, cut your cardboard box down into smaller panels:
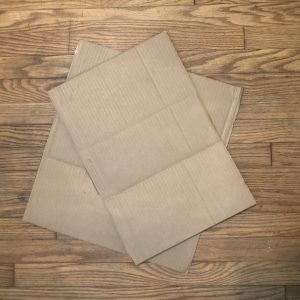
A box cutter or craft knife will be faster than scissors; but please be careful and make sure that only the adults use these tools.
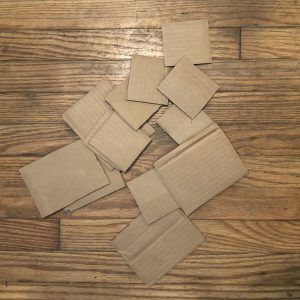
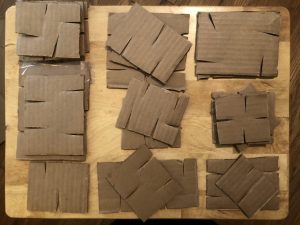
After you’ve cut the box into large panels, cut the panels into smaller squares and rectangles. I cut mine into a variety of shapes and sizes like these:
After you’ve cut your pieces, it’s time to cut some small wedges out, like this:
You can cut wedges from each side, from corners, you can even cut more than one wedge per side. I saved a few pieces without wedges so I could cut pieces custom as I went.
Here is a variety of the wedge pieces I created:
Once you have all your pieces cut, you can start combining pieces – if you slide pieces together by punching the cut out wedges together. Try combining pieces so that you can start building vertically. It takes some trial and error. Some pieces go together better to create bases, other pieces help make your structure more stable.
Try to build a sculpture with your pieces. Your sculpture can just be an interesting combination of shapes; but you can also try to make a sculpture that looks like a thing – maybe you could build a sculpture that looks like your favorite animal, or maybe you could build a ship (sea-going OR rocket), maybe you can make a sculpture that looks like a fabulous jungle plant, or maybe you have an even better idea that I can’t even begin to imagine!!!
My first sculpture was just exploring how the pieces work together. Here it is (I bet your sculptures will be even cooler!):
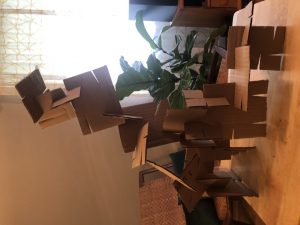
(sorry that’s sideways)
Ok, after you build your sculpture, email a photo to me at mdailey@sacredheartgradeschool.org
Please remember to include your child’s name (first and last) as well as their homeroom number – THANK YOU!
PS – save a few cardboard paper tubes for next week (paper towel roll or bathroom tissue roll).
Week of May 11
I hope everyone had a wonderful weekend and that you got a chance to celebrate all the wonderful mothers and grandmothers and mother figures in your lives!
Today we are going to do another around-the-house found object art assignment – so no special art supplies are needed today.
I thought it would be a wonderful way to round up our assignments this year to celebrate the wonderful place that has brought us all together – the school and community that has blessed all of our lives – Sacred Heart Grade School.
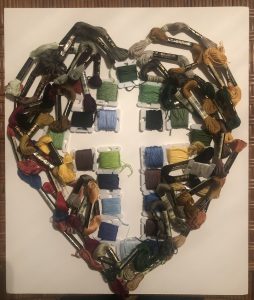
What we will be doing today is creating the simple symbol of SHGS – the cross inside the heart – with found objects from around your home or yard. This assignment is a little but like the face we did a few weeks ago in that we are just going to use things we can gather up from our everyday items. Feel free to use just about anything (be sure and check with your parents first!) and work in a size that is best for you and the objects you choose.
Maybe you’ll use food from the kitchen or toys from your playroom. Some kids might go outside and find rocks and leaves to create their symbol. You can use school supplies, arts and crafts supplies, kitchen utensils or whatever odds and ends you and your family can gather up!
I knew right away that I wanted to use some of my craft supplies because, first of all, I have a LOT of different supplies that I could find around the house; and second, they mean something to me – I love all the things I have to help me make and create! I went to my craft supplies and was very happy when I saw my box of embroidery thread – so many colors to work with! I made my heart and cross being very careful to try to keep the shape of the heart clean and visible:
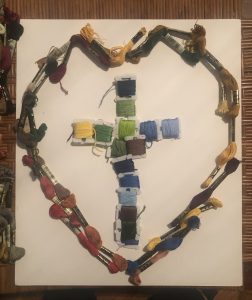
I used a piece of poster board I found with my other supplies so that I had a nice clean background to work on, then I got to work! I found it easiest to define the shape of the cross and then build the heart around it. You may find it easier to work in a different way. I tried making my Sacred Heart symbol a little differently, and liked how that turned out, too:
So now it’s your turn! Gather up some supplies from around your home and create your own beautiful interpretation of our Sacred Heart symbol.
Please email your photos to mdailey@sacredheartgradeschool.org and please be sure to include your child’s name and homeroom number in the subject line.
I have a sneaky feeling that Mrs. Malinoski would like to see these, so if you can, please photograph your artwork as a square today.